Part 1 of 2: Creating a workflow. This will include progressing and stopping stages, as well as milestones.
Create a Recruitment Workflow
A usual workflow would consist of:
- Just applied
- Shortlist
- Phone Screen
- Interview 1 & Automated Reminder
- Interview 2
- Reference Check
- Offer Approval
- Submitted to Onboarding
- Placed
A breakdown of each stage and if it’s Mandatory or Optional:
Just Applied (Mandatory)
This is the stage where candidates appear in when they first apply to a job.
Shortlist (Optional)
Here is where you proceed the good candidates that you want to continue with.
Phone Screen (Optional)
This is where you will have a form in this stage to appear when you call the candidate and do a phone screening
Interview 1 (Optional)
In the front end, this is a 2 step stage.
The first step is a calendar invite. Here you will set up the date, time, location, and any panel members for the interview. You can also add in a zoom link if it is online.
The second step is an email with the confirmation details to the candidate.
We also have the option to send the candidate an automated reminder about their interview. Please see how to do this in the video below:
Interview 2 (Optional)
This is the same as interview 1, should there be a second round of interviews.
Reference Check (Mandatory if you have the reference check module)
If you have the reference check module, the reference check process will added to this stage.
When a candidate is moved to this stage, the reference check form can either be done manually by you or sent to the candidate to provide their referees.
Once provided, you can send the referees the form automatically or call them and complete it on their behalf.
Offer Approval (Mandatory)
This stage is KEY as this is where all the final details such as position title, remuneration, etc, for the candidate will be finalised.
This is also where all the details will come from for the contract.
Submitted to Onboarding (Mandatory)
This is where you will select the pack for the candidate to complete. This will typically include the contract, policies, and forms they will need to complete. The contract that is tagged will take the details from the Offer Approval stage.
Placed (Mandatory)
This is the final stage where candidates will move to automatically once a pack has been completed. You don’t need to do anything here.
To create a workflow:
In account settings, go to 'Job', then 'Recruitment workflow'. Click on '+ New Recruitment Workflow' to create a new workflow, then choose 'No order', and enter name.

Enter the name of the workflow.

Add a progress stage, and select ‘From Scratch’.


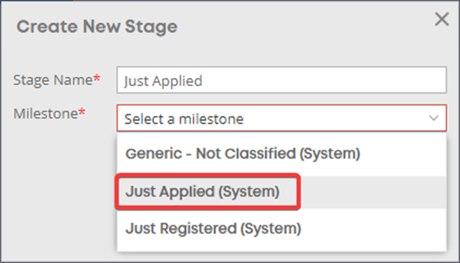
The first stage will always be just applied, enter that as the stage name. Then click ‘Just Applied (System)’ as the milestone.

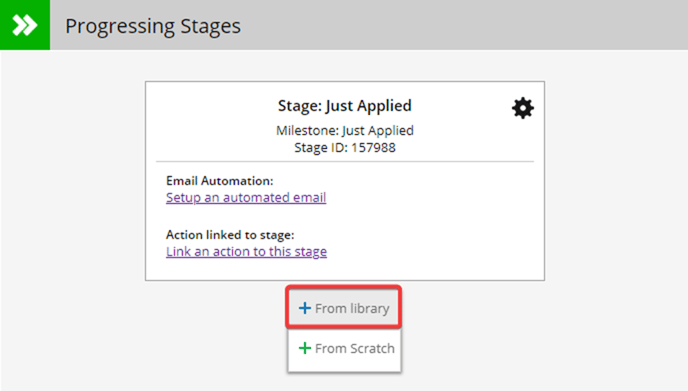
Add more stages by clicking on the green circle with the plus sign in the middle.

Then select ‘From Library’.

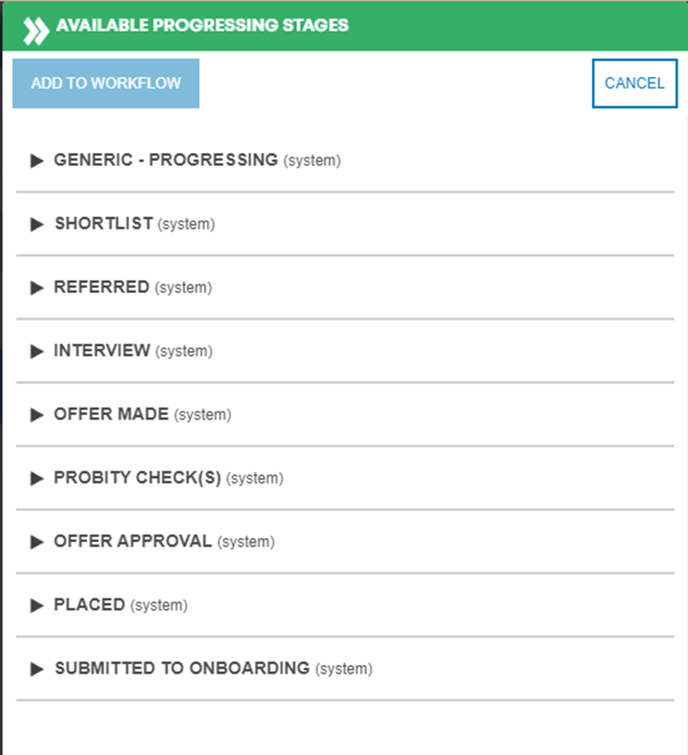
There are multiple stages you can choose from in the library.

If your desired stage isn't there, you can make one from scratch. Enter the stage name, and then put in the type of milestone as well.

Once you are happy with your workflow, add in a placed stage.

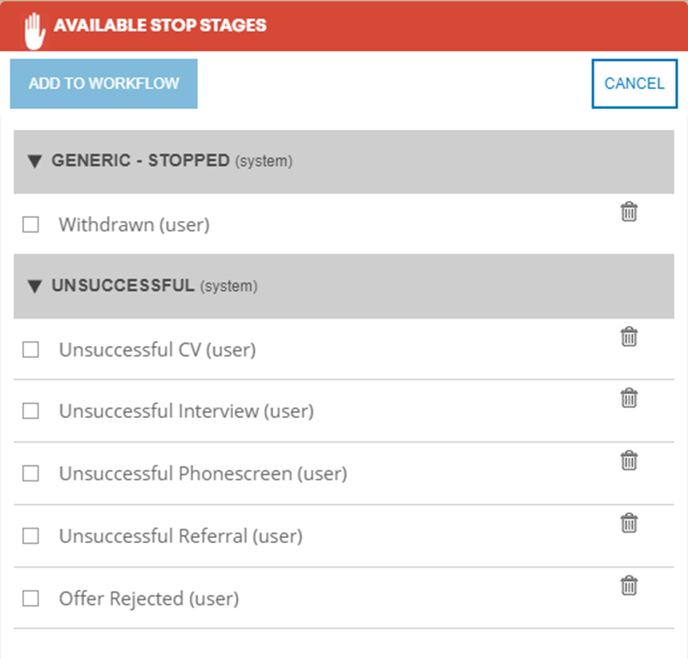
When you are done with the progressing stages, start adding in ‘Stopped Stages’. Click on ‘+add a stop stage’.

Then ‘Pick from library’

You can then add the stop stages you would like.

Once you are happy with your workflow, make it live.

Once it is live, you can still make all the changes you would like to it.
Benefits of Recruitment Workflows in Martian Logic
-
🛠️ Customised for You: Tailor workflows for different roles, teams, or hiring needs
-
✅ Standardised Process: Ensure every hire follows a consistent, compliant path
-
⚙️ Automation Ready: Reduce admin by automating tasks and communications
-
📈 Clear Oversight: Track progress at every stage and improve hiring efficiency
Need help designing your ideal workflow? Your Martian Logic Account Manager can help you map out your current process and translate it into a streamlined, automated recruitment workflow in the platform.
With the right recruitment workflow in place, you’ll hire smarter, faster, and with full visibility—every time.
